Bare minimum requirements
1. 유닛 테스트를 통과시키세요.
먼저 테스트 주도 개발을 연습합니다. 직접 test/app.test.js를 수정하여 통과하지 않는 테스트를 모두 통과시키세요.
- 애플리케이션은 node.js로 작성되어 있습니다. node.js LTS 버전을 준비합니다.
- 먼저 애플리케이션의 의존성(dependency)을 설치해야 합니다. npm install 명령을 이용해 의존성을 설치합니다.
- 테스트가 통과하는지 확인하려면 npm test 명령을 이용합니다. 다음과 같이 테스트가 통과하지 않는 것을 먼저 확인하세요.
➜  npm test

> mini-node-server@1.0.0 test
> mocha ./test

Server listening on http://localhost:4000


  유닛 테스트 101
    1) 결과에 대한 기대값(expectation value)를 비교하여 유닛 테스트를 할 수 있습니다
    2) 서버에 GET / 요청을 보내면 Hello World!라는 텍스트가 응답으로 옵니다
    3) 서버에 POST /upper 요청에 body를 실어 보내면 응답은 대문자로 돌려줍니다
    4) 서버에 POST /lower 요청에 body를 실어 보내면 응답은 소문자로 돌려줍니다


  0 passing (35ms)
  4 failing

  1) 유닛 테스트 101
       결과에 대한 기대값(expectation value)를 비교하여 유닛 테스트를 할 수 있습니다:
     AssertionError: expected 2 to equal '기댓값이 채워지지 않았습니다'
      at Context.<anonymous> (test/app.test.js:13:25)
      at processImmediate (node:internal/timers:463:21)

 (생략)
test/app.test.js 파일을 열어 통과하지 않는 테스트를 수정하세요. FILL_ME_IN이라고 적힌 곳에 기댓값을 적어주면 됩니다.
2. GitHub Action을 이용해서 Node.js CI를 적용하세요.
- node 버전은 16 버전으로 반드시 지정해야 합니다.
- 다음 상황에서 GitHub Action이 트리거되어야 합니다.
- master로 push 했을 경우
- pull request를 보낸 경우
- Pull Request로 제출하세요.
Getting Started
- node.js 프로그램의 테스트를 위해서는 npm test 명령어를 CI, 즉 GitHub Action 상에서 자동으로 실행해줘야 합니다.
- 먼저 공식 문서를 통해 GitHub Action의 사용방법을 알아봅시다.
Creating starter workflows for your organization - GitHub Docs
Overview Starter workflows allow everyone in your organization who has permission to create workflows to do so more quickly and easily. When you create a new workflow, you can choose a starter workflow and some or all of the work of writing the workflow wi
docs.github.com
Using starter workflows - GitHub Docs
About starter workflows GitHub offers starter workflows for a variety of languages and tooling. When you set up workflows in your repository, GitHub analyzes the code in your repository and recommends workflows based on the language and framework in your r
docs.github.com
실습과정
1. 유닛 테스트를 통과시키세요.
먼저 받아온 실습파일의 의존성을 설치하고 테스트 코드를 확인하고 테스트를 실행해 어떤 테스트가 통과돼야하는지 확인한다.
app.test.js파일 내용과 npm test 실행 결과 ▼
const { expect } = require('chai')
const request = require('supertest')
const { app, server } = require('../app')
const FILL_ME_IN = '기댓값이 채워지지 않았습니다'

describe('유닛 테스트 101', () => {

  after(() => {
    server.close()
  })

  it('결과에 대한 기대값(expectation value)를 비교하여 유닛 테스트를 할 수 있습니다', () => {
    expect(1 + 1).to.be.equal()
    expect(100 + 200).to.be.equal()
  })

  it('서버에 GET / 요청을 보내면 Hello World!라는 텍스트가 응답으로 옵니다', () => {
    return request(app)
      .get('/')
      .then(res => {
        expect(res.text).to.be.equal()
      })
  })

  it('서버에 POST /upper 요청에 body를 실어 보내면 응답은 대문자로 돌려줍니다', () => {
    return request(app)
      .post('/upper')
      .send('"coDeStaTes"')
      .set('Content-Type', 'application/json')
      .then(res => {
        expect(res.body).to.be.equal()
      })
  })

  it('서버에 POST /lower 요청에 body를 실어 보내면 응답은 소문자로 돌려줍니다', () => {
    return request(app)
      .post('/lower')
      .send('"coDeStaTes"')
      .set('Content-Type', 'application/json')
      .then(res => {
        expect(res.body).to.be.equal()
      })
  })
})
이제 테스트 결과가 어떻게 나와야하는지 확인했으니 테스트 코드를 적절하게 바꿔준다.
변경한 app.test.js파일 내용과 npm test 실행 결과 ▼
const { expect } = require('chai')
const request = require('supertest')
const { app, server } = require('../app')
const FILL_ME_IN = '기댓값이 채워지지 않았습니다'

describe('유닛 테스트 101', () => {

  after(() => {
    server.close()
  })

  it('결과에 대한 기대값(expectation value)를 비교하여 유닛 테스트를 할 수 있습니다', () => {
    expect(1 + 1).to.be.equal(2)
    expect(100 + 200).to.be.equal(300)
  })

  it('서버에 GET / 요청을 보내면 Hello World!라는 텍스트가 응답으로 옵니다', () => {
    return request(app)
      .get('/')
      .then(res => {
        expect(res.text).to.be.equal("Hello World!")
      })
  })

  it('서버에 POST /upper 요청에 body를 실어 보내면 응답은 대문자로 돌려줍니다', () => {
    return request(app)
      .post('/upper')
      .send('"coDeStaTes"')
      .set('Content-Type', 'application/json')
      .then(res => {
        expect(res.body).to.be.equal("CODESTATES")
      })
  })

  it('서버에 POST /lower 요청에 body를 실어 보내면 응답은 소문자로 돌려줍니다', () => {
    return request(app)
      .post('/lower')
      .send('"coDeStaTes"')
      .set('Content-Type', 'application/json')
      .then(res => {
        expect(res.body).to.be.equal("codestates")
      })
  })
})
잘 실행되는 것을 확인할 수 있다.
2. GitHub Action을 이용해서 Node.js CI를 적용하세요.
이 영상을 참고해 실습을 진행했다.
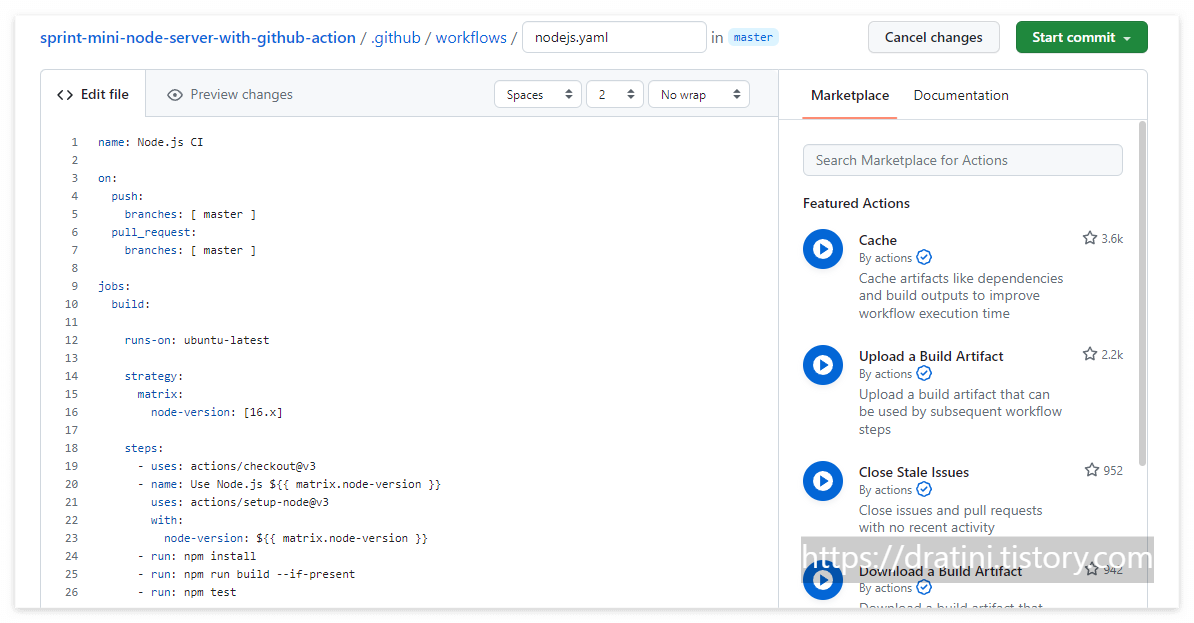
테스트를 진행할 레포지토리에 .github/workflows/nodejs.yaml 파일을 생성한다.
해당 파일의 구조는 다음과 같다.
name: Node.js CI #워크플로우의 이름을 적어준다.

on: # 워크플로우가 실행되는 EVENT에 대해 작성한다. master 브랜치에 push 또는 pull request가 올 경우 실행된다.
  push:
    branches: [ master ]
  pull_request:
    branches: [ master ]

jobs: # 실행되는 워크플로우의 작업을 지정한다. 여러 Job이 있을 경우, Default로 병렬 실행을 한다.
  build: # build하는 job이 존재하고 그 아래에 실행되는 step이 존재하는 구조다.

    runs-on: ubuntu-latest # 어떤 OS에서 실행될지 지정한다.

    strategy: # 어떤 언어의 어떤 버전에서 테스트할지 지정할 수 있다.
      matrix:
        node-version: [16.x]

    steps: # 어떤 액션들을 사용할지 지정한다. uses는 이미 만들어진 액션을 사용할 때 지정한다.
      - uses: actions/checkout@v3
      - name: Use Node.js ${{ matrix.node-version }}
        uses: actions/setup-node@v3
        with:
          node-version: ${{ matrix.node-version }}
      - run: npm install
      - run: npm run build --if-present
      - run: npm test
이렇게 파일을 작성하고 GitHub Actions 탭에 들어가 작동된건지 확인해보면

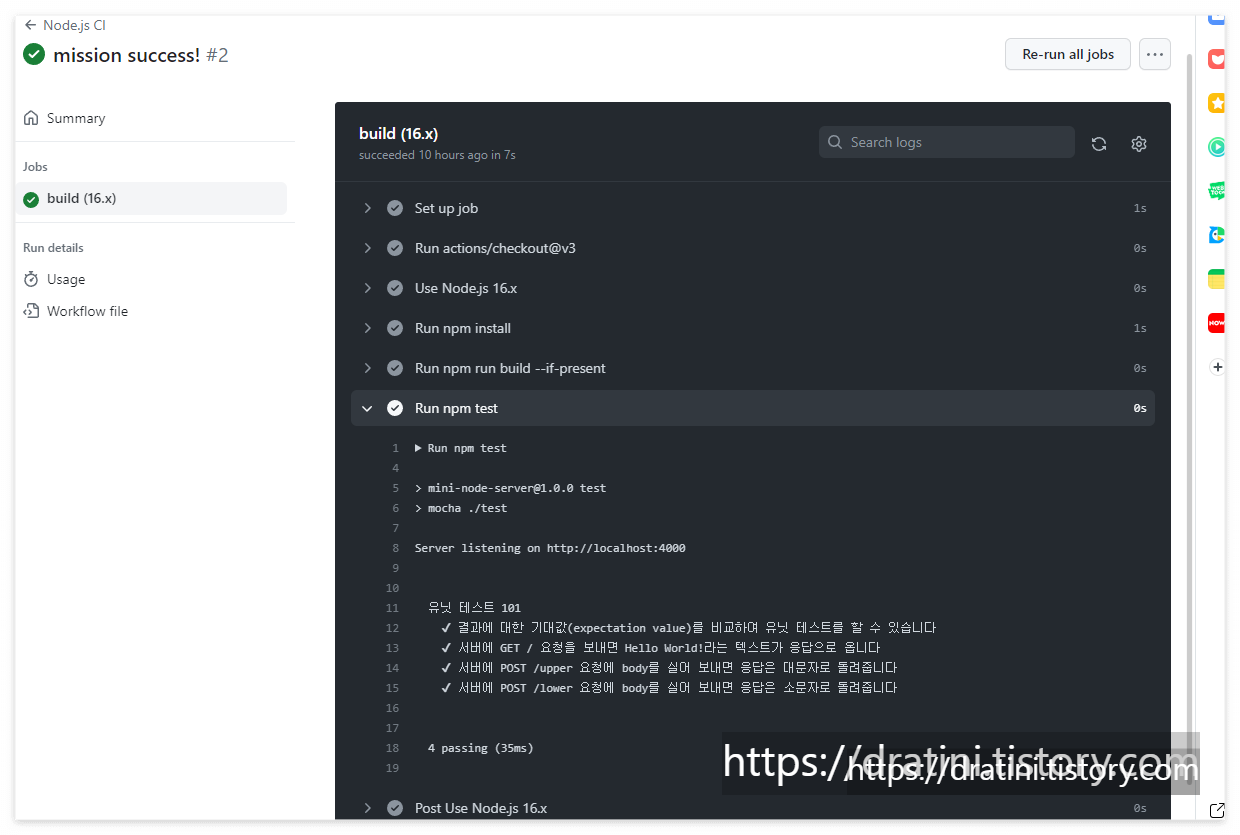
잘 작동하는 것을 확인할 수 있다!!
'DevOps' 카테고리의 다른 글
| [DevOps] 4/24 TIL : 배포 자동화 실습 - Client (0) | 2023.04.24 |
|---|---|
| [DevOps] 4/24 TIL : 배포 자동화 개념 (0) | 2023.04.24 |
| [DevOps] 4/20 TIL : CI/CD, 지속적 통합, 테스트 (0) | 2023.04.20 |
| [DevOps] 4/11 TIL : Docker 개념부터 기본 설치까지(Ubuntu) (0) | 2023.04.11 |
| [DevOps] 부트캠프 1차 팀프로젝트 회고 (0) | 2023.04.05 |